Want to have your CDs available on your computer? Winamp lets you rip (transfer and compress digitally) your CDs to your computer hard drive. This means you can listen to them without having to pop in the CD. It also means you can create your own playlists using individual tracks from different albums.
Note: Before ripping tracks to your computer, you should first configure the CD ripping settings. For more information, see Library Preferences: CD Ripping.
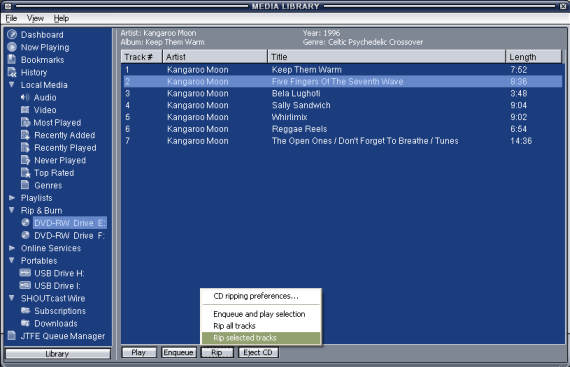
Media Library - Rip & Burn view

To rip CD tracks to your computer hard drive
Insert a CD that has tracks you want to transfer to your computer hard drive.
Open the View menu in the Winamp main window and click Media Library.
On the left side of the Media Library, click on your CD drive within the Rip & Burn list.
You may have to double-click Rip & Burn
to see your list of CD/DVD drives.
If you don't see the Rip & Burn node, then go to:
Winamp -> Preferences (Ctrl+P) -> Media Library -> Tree Options tab
and checkmark "Group CD Drives under the 'Rip & Burn' parent"
CDDB will automatically fill in the Titles, but if you wish to manually edit any of the CD Information first, right-click anywhere in the window, and select Edit CD Info.
If you want to rip some of the tracks on your CD, select the tracks you want to rip in the track list. You can keep Ctrl pressed down to select more than one track.
Open the Rip menu and click one of the following:
Rip selected tracks: Click this to rip the tracks currently selected in the track list.
Rip all tracks: Click this to rip all of the tracks on your CD, regardless of the currently selected tracks.
The status window appears
to show you track ripping progress and speed.
When done, the ripped tracks will be available in your Local Media views (Audio, Recently Added, etc) and will be physically located within the folder you specified in the CD Ripping Preferences.
For further in-depth information, a full comprehensive CD Ripping Tutorial by Gaekwad2 can be found in the Winamp Forums.
Related Topics: